Back on my manual lipsync using Tagarela. This one is faster to do and also easier, but of course, you’ll get only Anime lipsync (Anime lipsync only have 1 open mouth, there’s no O, U, I or any other mouth shape than A).
The method I’m using is just get Audio Source frequency. So basically it’s like music visualisation but for mouth.
What you need
Head mesh with 1 mouth blendshape
Voice
Audio Source
Here’s the script you should attach to head mesh.
using UnityEngine;
using System.Collections;

public class RealtimeLipsync : MonoBehaviour {

//LIPSYNC CORE
 [Header("Lipsync")]
 public AudioSource audioSource;
 public int mouthBlendShape;
 private float[] _samples = new float[64];
 private float clampedLipsync = 0f;

//PRIVATES
 private SkinnedMeshRenderer blendMesh;

void Awake(){
 blendMesh = GetComponent<SkinnedMeshRenderer>();
 }

void LateUpdate(){
 if(audioSource) DoLipsync();
 }

void DoLipsync(){
 if(audioSource.isPlaying){
 audioSource.GetSpectrumData(_samples,0,FFTWindow.BlackmanHarris);

clampedLipsync = Mathf.Clamp(_samples[2]*3000,0,100);

blendMesh.SetBlendShapeWeight(mouthBlendShape,clampedLipsync);
 }
 }
}
And here’s how to do it
Attach this script to your head mesh.
Also don’t forget to add audio source and assign audio source in this script. You can put Audio Source in whereever you want, but remember to assign audio source variable on this script.
To play sound, use like audioSource.clip = <your clip name>; then audioSource.Play();
Here’s my example to use this. I put it on my player script. It’ll automatically works whenever you have audioSrc.clip = clipName; audioSrc.Play();
That’s it, your mouth will move whenever the audio src playing sounds.
MEMEME Dance cover animated with 12FPS convert to 24FPS via virtualDub.
Ah where i’ve been ?! Just came out from cave and decided to write an article on my blog. (^・ω・^ )
I want to test out / render my anime technique on Unity. Let’s get MEMEME by Teddyloid feat. Daoko dance motion as example. I still need to fix its shader toon effect cause it looks breaking. Maybe I need to make modifications on stereoarts.jp shader just like how I modify Unity-Chan shader. I’ve seen how Guilty Gear builds their 3D Anime style but I think it’s very very very long and complex (as always, my brain starts say “Ain’t nobody got time for that!”). So this is my own 3D Anime method.
Shader
On my earlier animation, I used modified Unity-chan shader. Since Stereoarts’ shader was compiled to cginc, it’s kinda difficult to modify it. I need to add Normal map and fix its toon ramp. You maybe say, Normal map is stupid to Anime, but you can make fake cloth fold by using normal map, I’m not going to make detail with Normal map, just fake cloth fold cause Anime without cloth fold is weird…
Unity-chan shader
Pros
Runs SSAO nicely (modified only)
Sometimes can give you really nice result
Cons
Not Support DX11
Can cause overbright sometimes
No outline color controller
Normal map has no function at all
No DoF / SSAO support (original one)
Many things to be set
Specular ?! Do you really think anime has Specular reflection ?
Stereoarts.jp shader
Pros
Support DX11 / Global Illumination
Full control
Cons
No normal map for fake cloth folds
SSAO makes it looks darker and unrealistic
Scene
So about 2 Cameras, I have to use Forward rendering cause deffered can’t render depth camera.
Why do you need Depth Camera ? Cause, if you want to have SSAO / Motion Blur / any other Post effect only on environment, then you have to split / make 2 cameras. 1 for environment and 1 for character. The minus is, Character won’t cast shadow. Your character / actor must have their own layer, for example “Actor” so in your Actor Camera, set culling mask to Actor only, depth = 1, and set clear flag to depth only. Remember to put Actor camera as a children of Environment camera. So you only need to animate environment camera.
For environment post processing, you can use effect like Depth of Field (but it wont affect actor), motion blur, SSAO, and even paint effect. Leave actor camera no effect.
Also, if you want to make games instead of animation, you can use deffered or just single camera and use baked AO instead of SSAO. There’s no such SSAO on anime character.
I’ve been made modified Unity’s SSAO that cull actors layer, but it doesn’t work and it only shows environment no actors.
Motion
Background motion blur
Anime usually has framerate of 12FPS and doubled / repeat it to 24FPS cause most film has framerate of 23.976 / 24FPS. I much prefer full 24 FPS than doubled 12FPS. To convert 12FPS to 24FPS, I use virtualDub. First, I render 12FPS on Unity then import on VirtualDub (Source 12FPS and convert to 24FPS) and done, it seems like the frame was doubled to become 24FPS.
As on Guilty Gear, they draw every motion on every frame and use step interpolation. Although it looks very anime style, but it’s very complex and took very long time. Simply decreasing framerate will do the same even you use Spline interpolation animation like mine. “Wait! The game should run in 60FPS! You can’t simply decreasing framerate to 12FPS to have anime looks!” Man! Think, readers! Think! Decreasing frame rate is possible via FBX (on Unity it should be named “samples”). I’ve tried compressing keyframe / frame rate through FBX.
Back then, I thought IES light was useless, but when I’m making an interior scene for my Animation I notice a weirdness on ceiling lights. It was circle!!! There’s no circle shaped ceiling lights (except lightbulb)!
Prtscr (Optional, if you don’t want to use MSPaint)
And IES / LDT light of course!
And this is how
Go to IES Viewer and right click on your IES or LDR light and then click Render, or simply just press CTRL+R. Sometimes, the Render window just wont show, just delete .ini file and reopen IESViewer.
Adjust brightness, Zoom, and Distance until you pleased with the result then press Prt Scn / Print Screen on your keyboard. If you don’t have PrtScr, then you’ll need to open MSPaint (Press Winkey + R and type MSPaint). If you have PrtScr, hold CTRL and left click the render window and it’ll automatically crop it.
Paste (CTRL+V) on MSPaint and then crop the pasted clipboard like this. Save it as JPG or PNG.
This is my IES Light
Now go to Unity and import your IES light. Set texture type as Cookie, Light type as Point, Mapping : Mirrored Ball, Glossy Reflection, Fixup Edge Seams, Alpha from Grayscale (IMPORTANT!), and filter mode to Trilinear.
Go to Game Object > Light > Point Light, and assign your IES file to Cookie texture.
Now look! IES Light on Unity! Although it’s not important, but it’ll make scene looks more realistic than a nonsense circle light.
I’ve noticed that Mediafire deleted the original script. Please use this script instead. This script is from my game (Project IMG). I’m sorry if there’s any error happened. This is more updated version and it’s C#
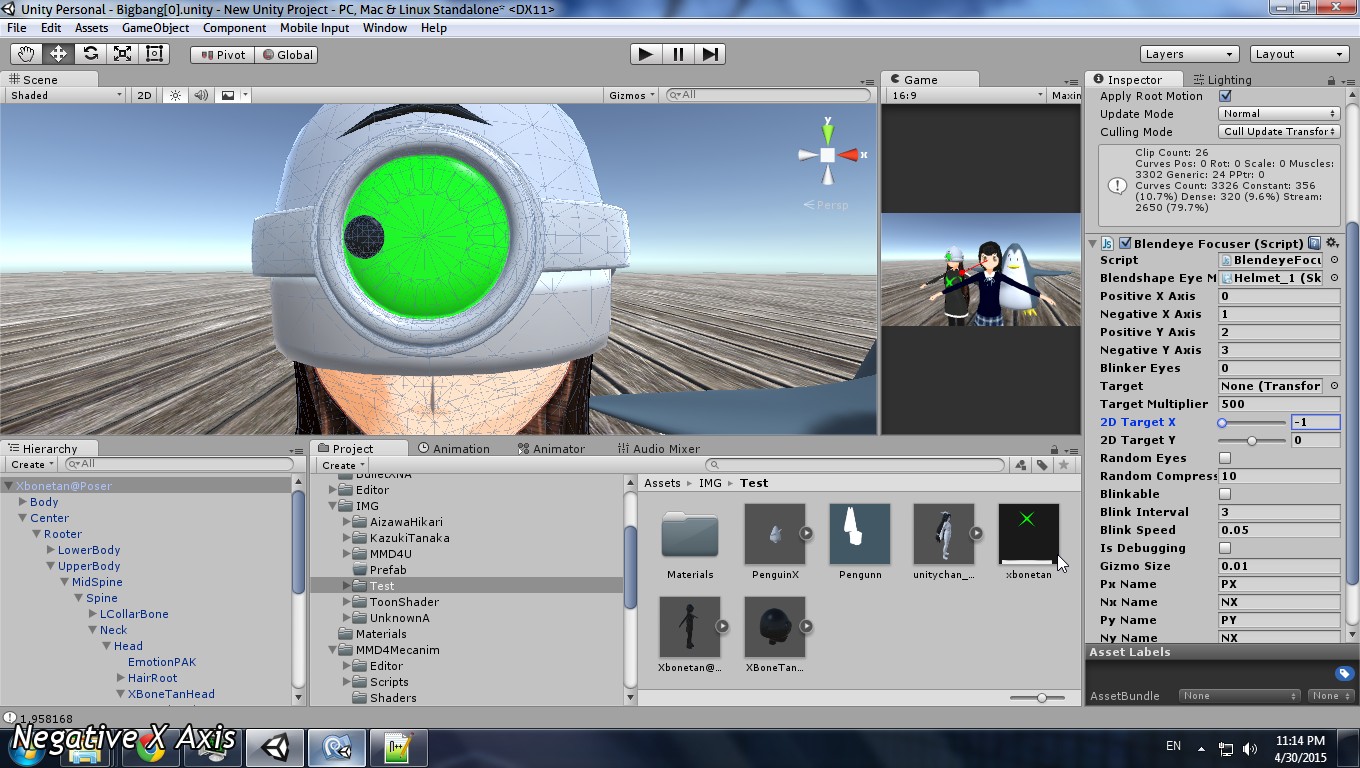
Controlling eyes with Unity’s blendshape controller is difficult especially Unity likes to make a blendshape is a float value which harder to control and you can’t even control any movement like down or left. The picture above represents the movement of their eyes. See closely with that cyclops, her eyes were move following that ball, meanwhile the penguin just stuttered with the eye (Random Eye and blink).
You’re gonna need 4 / 5 basic eye blendshapes like Up eye, Right eye, Down eye, Left eye, and blink (optional).
This is very useful tool especially for wannabe animator like me.
Assign the number / ID of your Blendshape as in your blendshape mesh. I added isDebugging mode, that’ll ease you out finding the number of the blendshape.
After found the right ID, now you’re done! You can control eye movement via 2D Target now. But is that enough ? LOL NOPE!
To make it focus in 3D Way, create an empty game object and set it as target.
Sometimes this might happens (A certain eye moves in reverse way), to fix it, just invert the blendshape ID like Positive X Axis was 0 and set it to 1 and Negative X Axis was 1 and set it to 0.
Now look! Your character will focus on that object forever! But if that’s not please you enough, you can use Random Eyes mover (I forgot to make it move along with your target, so it’ll move along with the center of your head). But if you really do want random movement along your target, then just remove “target” line below randomizer target transform.
And so do you want them blink ? just turn on Blinkable and your character will be blinkable. The higher value of blink speed the faster it’ll be. And what is Target Multiplier ? That’s just speed multiplier of your 3D target, how fast / sensitive their eye will follow your 3D target.
Flawless, I wish Bullet Physic comes to Unity 5. VMD Anim + FBX Anim demo.
So I found out how to Import PMD / PMX to Unity. My old trick uses Blender, PMD Importer, and FBX Exporter. It was like this below, (mine was old anyway…) *keep scrolling for a simpler way* Recipe
And it was really long and hard and it doesn’t even have an automatic physics configuring! And then I found this good guy posts about MMD4Mecanim which only import PMD / PMX to Unity Assets folder and it’ll automatically do the magic and poof! You got PMD model on Unity.
Any motions can be played with this
Why MMD4Unity ? Isn’t MMD just enough ?
Unity has Mecanim, it’s easier (for me) to animate especially a lazy person like me (too lazy to reanimate every locomotion for every model)
Unity 5 now has full access of epic post processing. Depth of Field! Bloom! Motion Blur! Edge Detection!
NOTE FOR PMD Users : Since I see this only supports PMX, you have to convert your PMD to PMX first. Download PMX Editor, then open your PMD file and save it as PMX.
And here’s how to import your PMD / PMX Model to Unity
Download and extract PMD / PMX Model, copy whole folder to Unity Assets folder
Then you’ll found there’s a MMD4Mecanim assets file (It has Unity logo)
Read the License agreement and then click process.
If you have a VMD File (MMD’s Motion data), copy your VMD data to Unity Assets and put your VMD to Animation Clip field.
Then press process
Always remember to set Animation Type to Humanoid then press Apply. If you not, no animation can be played unless you import a VMD file.
Remember to select your Animator controller and Check Apply Root Motion and turn on Bullet Physics
Now add your processed FBX to your scene, it’s now compatible for all your Mecanim like ThirdPersonHumanoid. If you want to add VMD to your mecanim, just Create a New state then put your anim-ized VMD there, and play.
Everyone was making games with Unity, so I make animation with Unity. Unity was such a good guy greg, Unity 5 free now supports every post processing / pro features. So I decided making animation with Unity. One thing that confused me, why 3D Animation software doesn’t have Mecanim / autorig like features ? I know there’s one named “Motion builder”, but it’s not easy or good as Animeeple or Mecanim. Anyway, I know making animation is not easy, but my mission is to find the easiest, most efficient, fastest and quickest way to make animation, it’s not 1980 anymore.
At first I was going to use Physical Renderer but to render basic environment + 2 characters with my 3D Software physical renderer and it took 4 hours to render 150 frames. It was so long, meanwhile using Unity only took 0.03 seconds per frame (Final render took only 1 to 2 seconds per frame).
As I said before I have a plan on making Original Net Anime with 3D Software but haven’t decided which I’ll use. But before jumps making Original Net Anime, I have to practice or make animation experiments so the viewer can’t yell **** about it. Seriously, I make this free and I didn’t beg even a penny from you or begging for crowdfunding.
These are animation experiment I’m gonna making :
Cosmos – kirin PV
Wedding Dress – Tae Yang dance scene
Kyoani Challenge (Rising, Run > Jump > Hanging, Turn back and scared, Manual Walk)
Nichijou Challenge (Rock paper scissor)
Mecanim Challenge (Running through corridors, Run + Jump on rooftop, Manual Walk / Run, Natural Motion + Facial)
Project Imaginechan shorts
Mitsubishi FTO TVC
Full length PV of my music Colorshift 2 / Signed in
Project Imaginechan Opening Intro
A Certain Musical Vocaloid
Every experiments has different workflow, for instance, wedding dress, I’m gonna make the motion from MMD then export VMD to Unity and start decorating. Cosmos PV will only use Unity 5. Kyoani Challenge will use Unity + Cinema 4D.
Therefore, I still have so many things to research. Making animation in Unity isn’t easy as you see. You have to deal with Unity’s spline interpolation.
Plus to make your character walking in unity using mecanim isn’t easy like playing games, you have to know how much speed and crossfade time while walking unless you are using Nav Mesh like my realtime animation back then. I put “Speed” state on Mecanim which controlled by NavMesh current speed.
It is so hard that you have to predict when NavMesh will arrive to destination (that’s why it’s easier to use Transform cause Unity wont give you a Live Preview of Mecanim). But making animation using MMD is much easier I say and the physics also looks flawless.
I already use this script since Catapult. This is the best saving script I ever use, but this is not really easy to use. I also developing my own format but it’s not really better than this. My own format will going to be use in Personified Fear or above game. Works with indie don’t worry.
It can save any types, but the most i liked is the Array function. It’s easier and much more safe.
For example, if you want to save sound volumes setting information (Javascript for example)
In your Menu GUI Script, put var volumes = new float[5];
Also set the awake / default value of volumes if Player haven’t set the volumes. like if(!PlayerPrefs.HasKey(“KeyName”)){ awakeVolumes[0] = Camera.main.audio.volume; awakeVolumes[1] = AudioListener.volume; volumes = awakeVolumes; PlayerPrefsX.SetFloatArray(“KeyName”, volumes);}
Then set on start / awake function, if(PlayerPrefs.HasKey(“KeyName”)){ volumes = PlayerPrefsX.GetFloatArray(“KeyName”, awakeVolumes); }
On your Scroll bar GUI of main volume (volumes[1]) or music volume (volumes[0]), the scrollbar value must be volumes[0] for music volume scrollbar. Whatever you set it, when player press Save, just put PlayerPrefsX.SetFloatArray(“KeyName”,volumes);
To delete user data, just simply put PlayerPrefs.DeleteKey(“KeyName”)
Okay, this is the script example of Menu GUI
var volumes = new float[5]; // volumes has 5 array of float with 0 value...
private var awakeVolumes = new float[5]; //must be same array with volumes above

function Awake(){

awakeVolumes[0] = Camera.main.audio.volume; //music volume
awakeVolumes[1] = AudioListener.volume;

if(HasKey("Game Volumes")){
volumes = PlayerPrefsX.GetFloatArray("Game Volumes", awakeVolumes);
Camera.main.audio.volume = volumes[0];
AudioListener.volume = volumes[1];
}else{
PlayerPrefsX.SetFloatArray("Game Volumes", awakeVolumes);
volumes = awakeVolumes;
}

function OnGUI(){

// let's skip making window process
GUILayout.Label("Music Volume");
volumes[0] = GUILayout.HorizontalScrollbar(volumes[0],0.0,1.0);
GUILayout.Label(volumes[0].ToString());

GUILayout.Label("Main Volume");
volumes[1] = GUILayout.HorizontalScrollbar(volumes[1],0.0,1.0);
GUILayout.Label(volumes[1].ToString());

if(GUILayout.Button("Save")){
PlayerPrefsX.SetFloatArray("Game Volumes", volumes);
}
if(GUILayout.Button("Delete")){
PlayerPrefs.DeleteKey("Game Volumes");
}

}

}
My New 2013 saver use something like XML but i’ll make own format to keep player to change every value on XML.
This tool will set all object children tag to parent’s tag. Without this, you would have to set every children tag one by one, with this, you’ll only need to drag one parent object to Object to change and every child object’s tag will be same with parent’s. But remember! The tag you want to change must add to Unity Tags (Unity > Edit > Project Settings > Layers and Tags).
This can be really useful you know since Unity wont let to change tags recursively.
Save it as javascript and put it on Editor folder… Ah yes, I put it on SKiPPER > Set Tag to launch this tool
class SetTagRecursively extends ScriptableWizard
{
	var objToChange : GameObject;
	var tag : String;

	function OnWizardUpdate () {
		//objToChange = Selection.gameObject;
	}

	function OnWizardCreate () {
		//for(x in objToChange){
			var x = objToChange.GetComponentsInChildren(Transform);
			for(var z in x) z.tag = tag;
		//}
	}

	@MenuItem("SKiPPER/Set Tag")
	static function TagRecursively () {
		ScriptableWizard.DisplayWizard("Change Tags Recursively", SetTagRecursively, "Touch to Henshin...");
	}
}


![Unity 2015-04-23 00-15-21-47.avi_snapshot_00.00_[2015.04.23_19.16.54]](https://laboratoriesx86.wordpress.com/wp-content/uploads/2015/04/unity-2015-04-23-00-15-21-47-avi_snapshot_00-07_2015-04-23_19-17-18.jpg)
![Unity 2015-04-23 00-15-21-47.avi_snapshot_00.08_[2015.04.23_19.17.10]](https://laboratoriesx86.wordpress.com/wp-content/uploads/2015/04/unity-2015-04-23-00-15-21-47-avi_snapshot_00-08_2015-04-23_19-17-10.jpg)


